Grilling ribs might seem like a long process, but it’s actually pretty straightforward once you know the basics. The key to great grilled ribs is low and slow cooking with a good rub, occasional braising, and finishing with your favorite BBQ sauce for that perfect balance of tender meat and flavorful crust.
I’ve found that keeping your grill around 300°F and using foil to lock in moisture really helps get the ribs falling off the bone without drying out.

Whether you’re working with baby back ribs or St. Louis style, trimming off that membrane and applying a simple rib rub sets you up for success.
I like to grill them for a few hours, then wrap them with a mix of butter, brown sugar, and apple cider to braise on the grill, which makes all the difference.
Choosing and Prepping Your Ribs
Picking the right ribs and prepping them properly makes a huge difference in how flavorful and tender your ribs turn out.
The cut, quality, and cleaning steps before the grill all set the stage for great results.
Types of Ribs: Baby Back, Spare, Short, and Country-Style
Baby back ribs come from the top of the rib cage, near the backbone, and are smaller and leaner.
They cook faster and have a mild pork flavor, which I like when I want tender ribs without too much fat.
Spare ribs come from the lower side of the rib cage and have more fat, which makes them juicier and more flavorful.
They’re bigger and take longer on the grill but are great when you want rich-tasting ribs.
Back ribs are the ribs left after the baby backs are trimmed off the pork loin.
They have less meat than spare ribs but still pack flavor.
Country-style ribs aren’t really ribs but come from the shoulder area.
They have a higher meat-to-bone ratio and are great for grilling if you want meaty ribs without as much fat.
Selecting Quality Ribs for Grilling
When I shop for ribs, I look for an even layer of meat across the rack with no “shiners,” which are exposed bones with little meat.
Ribs should be light pink with consistent marbling; that’s a sign of good quality pork.
I avoid “enhanced” ribs—those with added solutions or injections—because they can add water weight and dilute flavor.
Also, I aim for slabs around 2 to 2.5 pounds with 12 to 13 ribs.
This size fits well on most grills and cooks evenly.
Trimming and Removing the Membrane
Before grilling, I pat my ribs dry and lay them meat side up on a cutting board.
I trim off any dangling bits of meat, excess fat, and loose bones.
This helps the ribs cook evenly and look neat.
Removing the silver membrane on the bone side is key.
It’s tough and keeps flavors from penetrating.
I slide a dull knife under the membrane near one end to loosen it, then grab it with a paper towel for grip and pull it off in one piece.
If it tears, I repeat until it’s all gone.
For more tips on prepping ribs the right way, you can check out this detailed guide on how to prep ribs.
Essential Seasoning and Marinating Tips

A good rib seasoning sets the stage for flavor, and marinating adds depth and moisture.
The secret is balancing bold spices with enough salt to bring out the meat’s natural taste while letting time work its magic.
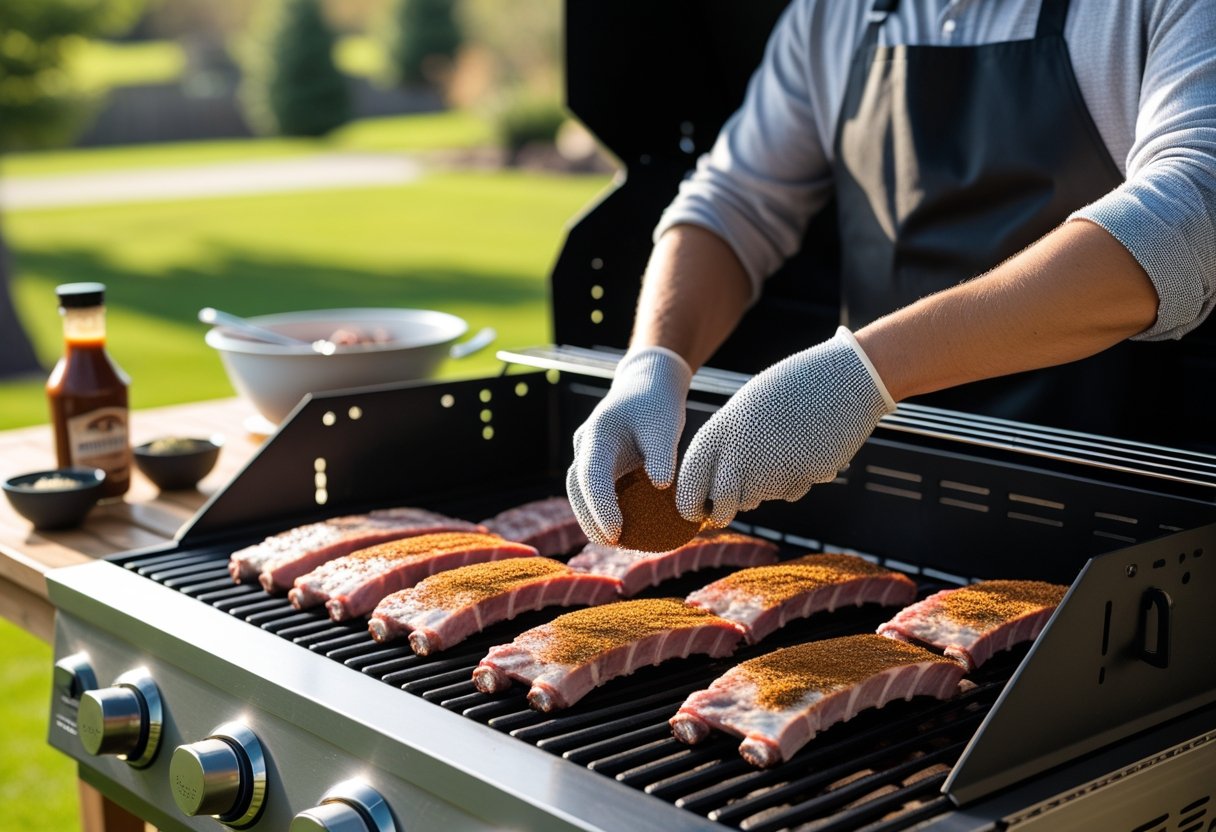
Making the Perfect Dry Rub
When I make a dry rub, I start with a base of kosher salt and brown sugar.
The salt seasons the meat and helps retain moisture, while the sugar caramelizes during grilling for a nice crust.
I like to add smoked paprika for that subtle smoky flavor without needing charcoal smoke.
Onion powder gives a savory depth without overpowering.
A pinch of cayenne pepper adds a little heat but doesn’t steal the show.
Here’s a simple dry rub mix I often use:
- 2 tbsp kosher salt
- 2 tbsp brown sugar
- 1 tbsp smoked paprika
- 1 tbsp onion powder
- 1 tsp cayenne pepper
I massage the rub all over the ribs, making sure to cover every inch.
Using Marinades for Added Flavor
Marinades are great for boosting moisture and infusing flavor deep inside the meat.
I prefer marinades with acidity like apple cider vinegar or a splash of soy sauce to help tenderize.
I mix in garlic, Worcestershire sauce, and sometimes a bit of honey or mustard for complexity.
Marinade time depends on how much flavor you want—usually 4 hours to overnight is perfect.
Remember to keep your ribs refrigerated while marinating and turn them occasionally so the liquid evenly coats the meat.
Applying Kosher Salt, Onion Powder, and Smoked Paprika
Kosher salt is my go-to because its coarse grains distribute evenly and don’t make the ribs too salty.
I sprinkle it first to start the seasoning process.
Onion powder adds a mellow, umami-rich aroma that brightens the overall taste without being sharp like fresh onions.
I use about a tablespoon for every rack.
Smoked paprika brings a warm, earthy smokiness to the rub, especially useful if you’re using a gas grill and want a hint of barbecue flavor.
It pairs well with the other spices and gives the ribs a nice red color.
Using these three in balance creates a solid flavor base.
Letting Flavors Penetrate
Once the ribs are seasoned or marinated, I always let them rest in the fridge for at least a few hours.
This step is crucial because it gives the spices and acids time to work their way into the meat.
I often leave ribs overnight wrapped loosely in plastic wrap to lock in moisture while still allowing flavor absorption.
If you skip this waiting period, the ribs might taste salty or just surface-level seasoned.
For detailed guidance on seasoning ribs, you can check this comprehensive seasoning and marinating guide.
Setting Up Your Grill for Ribs
Getting your grill ready right is key to cooking ribs that come out tender and flavorful.
This means choosing the fuel that fits your style, controlling the temperature carefully, and using the right tools to keep the smoke and heat just right.
Gas vs Charcoal Grills: What’s Best for Ribs?
When I grill ribs, I weigh the convenience of a gas grill against the smoky flavor a charcoal grill delivers.
Gas grills heat up fast and let me control the temperature with knobs, so maintaining consistent heat is easier.
This is great for ribs since they need slow, even cooking.
Charcoal grills, on the other hand, require more work but add rich, smoky flavor.
You have to build a fire, manage the coal placement, and adjust vents, but the end taste can be worth it.
Both work well if you set them up properly for indirect cooking, which avoids flare-ups and gives ribs their signature tenderness.
Temperature Control and Indirect Cooking
Ribs need to cook low and slow at around 225°F to 250°F.
I usually aim for this grill temperature when smoking or grilling ribs on either gas or charcoal.
Since ribs are delicate, it’s important to keep them away from direct flames.
Indirect cooking means placing the ribs on the cooler side of the grill, not right over the heat.
On gas grills, I turn off the burners directly under the ribs and keep other burners on low.
With charcoal, I bank the lit coals to one side and put the ribs on the opposite side.
This setup allows the ribs to cook gradually without burning.
Using a drip pan filled with water under the ribs also helps keep moisture in and prevents flare-ups.
Preparing Aluminum Foil and Smoker Boxes
Aluminum foil and smoker boxes are game-changers when grilling ribs.
I use foil for wrapping ribs during grilling to lock in moisture.
You can wrap ribs tightly after the initial cooking phase to help break down connective tissue, making ribs tender.
A smoker box is essential, especially on a gas grill, to add that wood-smoked flavor.
I fill the smoker box with soaked wood chips (like hickory or apple) and place it over the hot burner.
It produces a steady smoke without the hassle of a charcoal fire.
If I don’t have a smoker box, I make little packets of soaked wood chips wrapped in foil with small holes poked to release smoke.
This easy trick lets me add smoky flavor no matter the grill type.
Grilling, Saucing, and Serving Like a Pro
Perfect ribs come from careful temperature control, knowing when to add sauce, and proper resting before serving.
These details make all the difference when you want ribs that are juicy, tender, and full of flavor.
How to Grill Ribs Low and Slow
When I grill ribs low and slow, I set my grill temperature between 225°F and 250°F.
This slow cooking over indirect heat breaks down the connective tissue, making the meat tender without drying it out.
I always use a two-zone setup, placing the coals or burners on one side and the ribs on the opposite side to avoid direct flames.
Maintaining a steady temperature is key.
I monitor it with a meat thermometer or a grill thermometer placed near the ribs.
I usually cook spare or baby back ribs for about 3 to 4 hours, turning them occasionally to ensure even cooking.
When and How to Add BBQ Sauce
I prefer to add barbecue sauce during the last 30 minutes of cooking to avoid burning the sugars in the sauce.
If I slather it on too early, it can char and get bitter.
I brush a thin, even layer over the ribs and repeat every 10 to 15 minutes to build up a sticky glaze.
You can use store-bought or homemade bbq sauce, depending on your flavor preference.
For best results, wait until the ribs are nearly cooked through before saucing.
This lets the smoke and rub flavors develop fully, while the sauce adds moisture and tang for that classic finish.
Checking Doneness with a Meat Thermometer
I rely on a meat thermometer to know exactly when my ribs are done.
For tender ribs, I look for an internal temperature of about 190°F to 205°F.
At this range, the collagen melts, making the meat fall-off-the-bone tender.
Besides temperature, you can do a bend test: lift the rack with tongs in the middle and watch if it bends and cracks easily.
But a thermometer is the most accurate and foolproof method.
Always measure in the thickest part without touching the bone for precise results.
Resting, Slicing, and Plating Your Ribs
After grilling, I always rest the ribs for 10 to 15 minutes. Resting lets the juices redistribute within the meat.
When I slice, I cut between the bones using a sharp knife. This makes even portions for serving.
I plate the ribs with some extra bbq sauce on the side for dipping.
For a nice presentation, I sometimes sprinkle chopped green onions or fresh herbs on top. This adds color and a fresh touch.