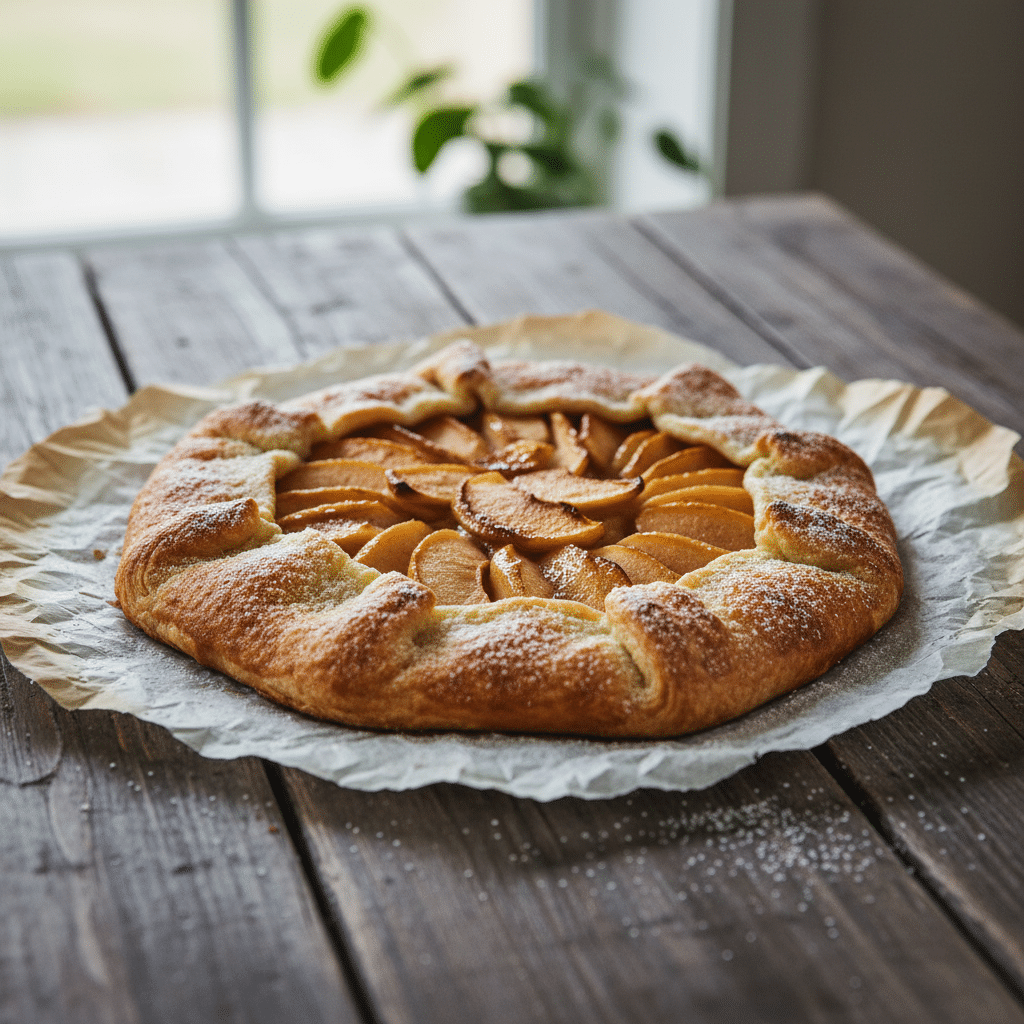
Apple galette is one of those desserts that looks impressive but is actually incredibly easy to make. It’s a rustic French tart—basically a free-form pie with a flaky crust folded over caramelized apples. No pie dish, no perfect crimping, no stress. You just roll out the dough, pile on the apples, fold up the edges, and bake. The result is this beautiful, golden, rustic dessert that tastes like you spent hours on it.
I started making galettes years ago when I wanted homemade pie but didn’t want to deal with fitting dough into a pie dish or making it look perfect. Galettes are meant to be rustic and imperfect—that’s part of their charm. Now they’re my go-to when I’m craving something with apples and pastry but want to keep it simple.
Why This Recipe Works
What makes apple galette special is its simplicity and the contrast of textures. The crust is buttery, flaky, and golden. The apples are tender and caramelized with cinnamon and sugar. And because it’s free-form, you don’t have to worry about making it look perfect—rustic is the goal.
The key is using cold butter in the dough for maximum flakiness, slicing the apples thin so they cook evenly, and brushing the crust with egg wash for that beautiful golden color. It’s all the best parts of apple pie without the fuss.
The Complete Recipe
What You’ll Need
For the Pastry Crust:
1¼ cups all-purpose flour
1 tablespoon granulated sugar
½ teaspoon salt
½ cup (1 stick) cold unsalted butter, cut into small cubes
3-4 tablespoons ice water
For the Apple Filling:
3-4 medium apples (Granny Smith, Honeycrisp, or a mix), peeled and thinly sliced
3 tablespoons granulated sugar
1 tablespoon all-purpose flour
1 teaspoon ground cinnamon
¼ teaspoon ground nutmeg
1 tablespoon lemon juice
1 tablespoon butter, cut into small pieces
For Assembly:
1 egg, beaten (for egg wash)
1 tablespoon coarse sugar (turbinado or demerara)
Powdered sugar for dusting (optional)
For Serving:
Vanilla ice cream or whipped cream
Step-by-Step Instructions
Step 1: Make the Pastry Crust
In a large bowl, whisk together the flour, sugar, and salt.
Add the cold butter cubes. Using a pastry cutter or your fingers, work the butter into the flour until the mixture resembles coarse crumbs with some pea-sized pieces of butter remaining.
Add 3 tablespoons of ice water and mix with a fork until the dough starts to come together. If it’s too dry, add the remaining tablespoon of water.
Turn the dough out onto a lightly floured surface and gently knead it a few times until it comes together. Shape it into a disk, wrap in plastic wrap, and refrigerate for at least 30 minutes (or up to 2 days).
Step 2: Prepare the Apple Filling
Peel and core the apples, then slice them thinly (about ⅛ inch thick).
In a large bowl, toss the apple slices with the sugar, flour, cinnamon, nutmeg, and lemon juice. Mix until the apples are evenly coated.
Step 3: Roll Out the Dough
Preheat your oven to 400°F (200°C). Line a large baking sheet with parchment paper.
On a lightly floured surface, roll the chilled dough into a 12-inch circle. It doesn’t need to be perfect—rustic is the goal. The dough should be about ⅛ inch thick.
Carefully transfer the dough to the prepared baking sheet.
Step 4: Assemble the Galette
Arrange the apple slices in the center of the dough, leaving a 2-inch border around the edges. You can arrange them in concentric circles or just pile them on—both look great.
Dot the apples with the small pieces of butter.
Fold the edges of the dough up and over the apples, pleating as you go. The center will be open, showing the apples. Press gently to seal any cracks.
Step 5: Add the Finishing Touches
Brush the crust with the beaten egg wash. This gives it that beautiful golden color.
Sprinkle the crust with coarse sugar for extra crunch and sparkle.
Step 6: Bake
Bake for 35-45 minutes, until the crust is golden brown and the apples are tender and caramelized. If the crust is browning too quickly, tent it loosely with aluminum foil.
Remove from the oven and let cool for at least 10 minutes before slicing.
Step 7: Serve
Dust with powdered sugar if desired. Slice and serve warm or at room temperature with vanilla ice cream or whipped cream.
Tips I’ve Learned Along the Way
Keep the Butter Cold: Cold butter creates steam pockets in the dough, which makes it flaky. If the butter gets too warm, chill the dough again before rolling.
Don’t Overwork the Dough: Mix just until it comes together. Overworking develops gluten and makes the crust tough.
Slice Apples Thin: Thin slices cook evenly and create a better texture. Use a mandoline if you have one.
Use a Mix of Apples: Combining tart (Granny Smith) and sweet (Honeycrisp) apples gives the best flavor.
Don’t Skip the Egg Wash: It’s what gives the crust that beautiful golden color.
Let It Cool: The filling needs time to set. If you cut it too soon, it will be runny.
Make Ahead: You can make the dough up to 2 days ahead and refrigerate, or freeze it for up to 3 months.
Variations I Love:
Pear Galette: Use pears instead of apples
Berry Galette: Use mixed berries with a bit more flour to thicken
Apple-Cranberry: Add fresh or dried cranberries to the apples
Caramel Apple: Drizzle with caramel sauce before serving
Almond Cream: Spread a layer of almond cream (frangipane) under the apples
Why This Dessert is a Winner
Apple galette is everything I love about baking—it’s simple, forgiving, and absolutely delicious. The rustic, imperfect look is part of its charm, so you don’t have to stress about making it perfect. And the combination of flaky, buttery crust with tender, caramelized apples is just unbeatable.
What I love most is how it feels special without being complicated. It’s the kind of dessert you can make on a weeknight but that’s impressive enough to serve to guests. And it’s so much easier than making a traditional pie.
It’s also incredibly versatile. You can use whatever fruit is in season—apples in fall, berries in summer, pears in winter. The technique stays the same, and it always turns out beautifully.
Serving Suggestions
Apple galette is perfect with:
Vanilla ice cream (classic pairing)
Whipped cream
Caramel sauce
Crème fraîche
Hot coffee or tea
Warm apple cider
The Bottom Line
If you love apple pie but find it intimidating, apple galette is your answer. It’s all the best parts of pie—flaky crust, caramelized apples, warm spices—without the stress of making it look perfect. The rustic, free-form style is part of its charm.
I make this all the time during apple season because it’s easy, reliable, and always impressive. It’s one of those recipes that makes you look like a great baker when really, it’s just a simple technique that anyone can master.
Give it a try, and I think you’ll find yourself making galettes all year round with whatever fruit is in season.
Have you made a galette before? What’s your favorite fruit to use? Let me know in the comments!
Recipe Card
Apple Galette
Prep Time: 20 minutes
Chill Time: 30 minutes
Cook Time: 40 minutes
Total Time: 1 hour 30 minutes
Servings: 6-8
Difficulty: Easy
Ingredients:
Pastry Crust:
1¼ cups all-purpose flour
1 tablespoon granulated sugar
½ teaspoon salt
½ cup cold unsalted butter, cubed
3-4 tablespoons ice water
Apple Filling:
3-4 medium apples, peeled and thinly sliced
3 tablespoons granulated sugar
1 tablespoon all-purpose flour
1 teaspoon ground cinnamon
¼ teaspoon ground nutmeg
1 tablespoon lemon juice
1 tablespoon butter, cut into pieces
Assembly:
1 egg, beaten
1 tablespoon coarse sugar
Powdered sugar (optional)
Instructions:
Mix flour, sugar, salt in bowl
Cut in cold butter until mixture resembles coarse crumbs
Add ice water, mix until dough comes together
Shape into disk, wrap, refrigerate 30 minutes
Toss apple slices with sugar, flour, cinnamon, nutmeg, lemon juice
Preheat oven to 400°F, line baking sheet with parchment
Roll dough into 12-inch circle on floured surface
Transfer to baking sheet
Arrange apples in center, leaving 2-inch border
Dot apples with butter pieces
Fold edges up and over apples, pleating as you go
Brush crust with egg wash
Sprinkle crust with coarse sugar
Bake 35-45 minutes until golden and apples are tender
Cool 10 minutes
Dust with powdered sugar, serve with ice cream
Tips for Success:
Keep butter cold (creates flaky crust)
Don’t overwork dough
Slice apples thin (⅛ inch)
Use mix of tart and sweet apples
Don’t skip egg wash (golden color)
Let cool before slicing (filling sets)
Storage:
Store covered at room temperature up to 2 days
Refrigerate up to 4 days
Best served day of baking
Nutrition (per serving):
Calories: ~280
Fat: 14g
Protein: 3g
Carbohydrates: 37g
Fiber: 2g